
How to Decorate a Christmas Tree Step-by-Step
Follow this guide for decorating your Christmas tree for a perfectly decorated tree every time! These step-by-step instructions are easy to follow and give great results. Your tree will be the centerpiece of Christmas entertaining.
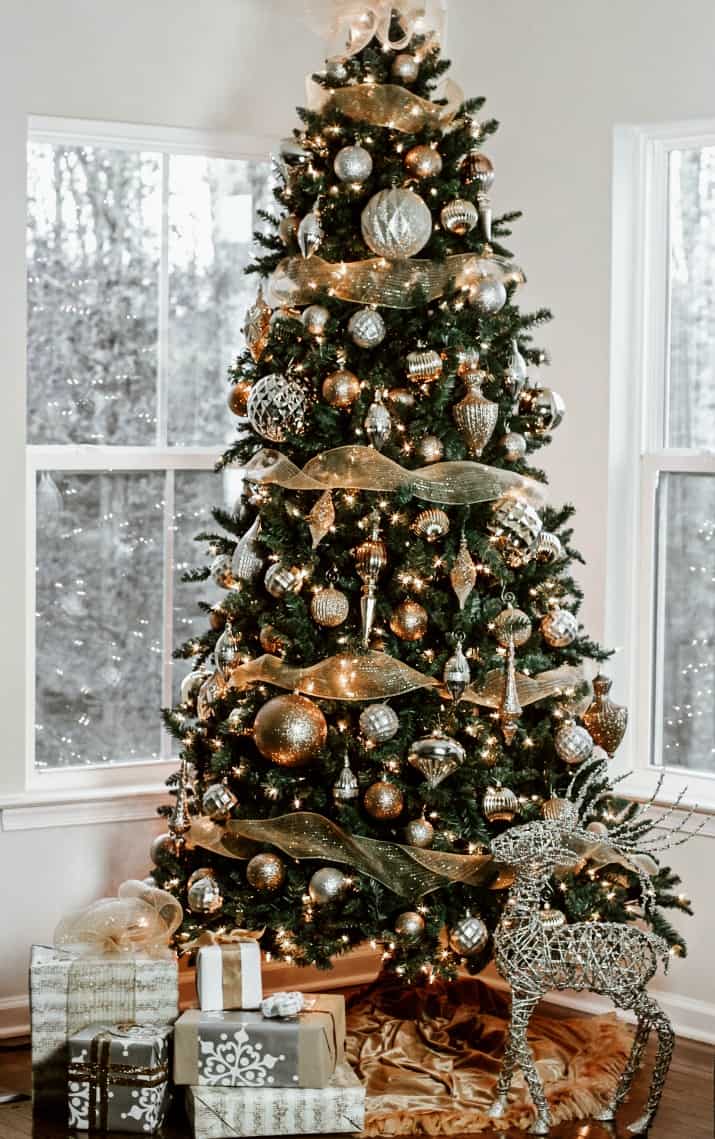
I’m sharing tips about decorating your Christmas tree, that can really make a difference in how it looks. I’ll also tell you how to do it so it’s easy to switch up the look and theme each year.
We have an 8-foot pre-lit tree and couldn’t be happier with how it looks and how it saves time. There’s no more shopping, loading it in the car, trimming branches, and watering. Plus, we can put it up as early as we like!

Mix & Match Decorations
I don’t want to spend a fortune on seasonal decorating so thanks to a few smart purchases I’m able to do it without breaking the bank.
Create a foundation for decorating that will give you more options for years to come. These tree trimming tips will insure you can change it up year after year.
- Purchase a large boxed set of ornaments. I bought a set of 82 ornaments in a mix of gold and silver. There’s a variety of shapes, sizes, and textures, and it blends in perfectly with any room. This same rule will work with an all white set of ornaments too.
- Choose neutral colors. I chose the pack of gold and silver because I like to change my decor every year. Having a foundation set of metallic or white ornaments means you can mix and match it with other colors or statement pieces to get a completely new look.
- Buy smaller sets of different colors. Over the years I’ve collected smaller boxed sets of a single color including red, green, black, white, and blue ornaments. This allows me to give the tree a different look without starting from scratch.
- Simply start decorating with the new theme color and then fill out the tree with your basic set. You can even go further and use only gold or only silver from that starter set.
- Use themed or specialized ornaments strategically. If you love collecting ornaments from your travels, or with specific themes, you can easily incorporate them into the ornament sets I’ve described above. Just place them so they’re in a prominent position on your tree, and fill in with the other basic ornaments.
To give you an example of how this works, I’ve created a different color combination or theme almost every year. The exception being that I’ll sometimes simply go back to the original metallic set that started this whole thing. Here are a few combinations I’ve created over the years:
- Red, White, and Black
- Red and Green
- Green and Blue
- Red and Metallic
- White and Metallic
- Red and White
- Green and White
- Red and Whimsical Themed pieces
- Metallic and Black
- White and Snow Themed pieces
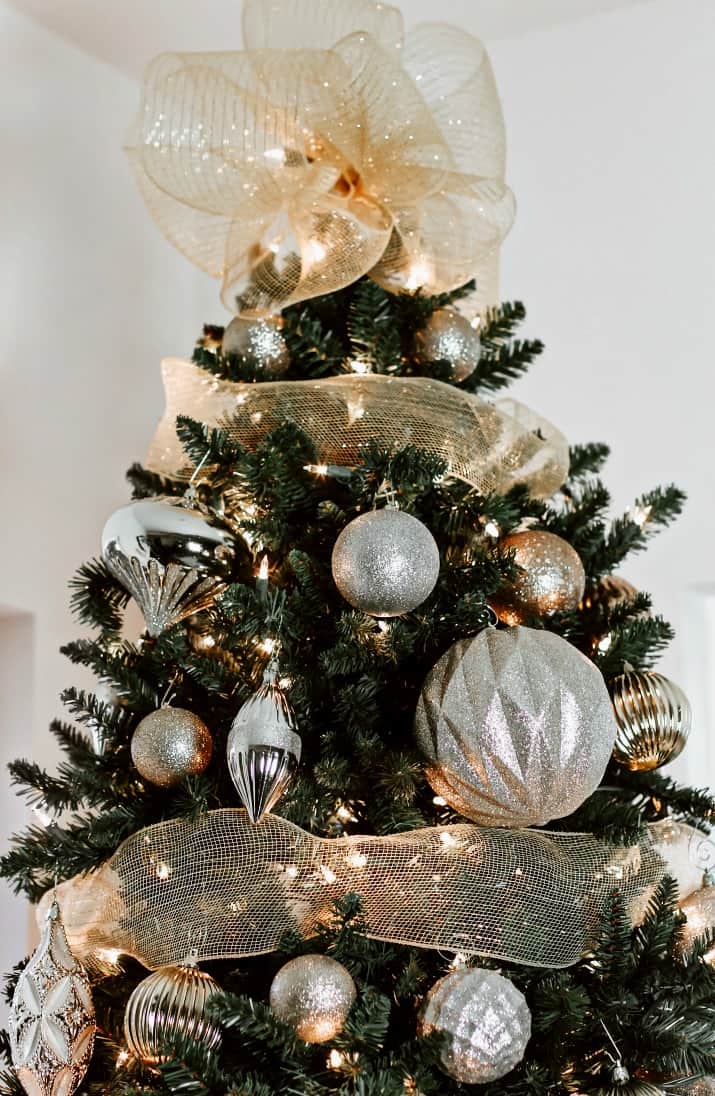
When you have a collection of ornaments that are in a neutral tone, you can alter the look or theme of your tree each year. Use them as the base for the décor and then add 10-20 specialty ornaments to create a specific theme.
The specialty ornaments will stand out as the theme of the tree while the neutral set simply adds filler.
Quick Tip
Buy a large set of neutral ornaments to start your collection. Gold, silver, white, or clear can mix and match with any other Christmas theme you may want to create going forward.

Decorate Step by Step
Here’s some advice I’ve gotten from design professionals over the years, as well as things I’ve discovered on my own. Everything is done in layers following a specific method.
Start with Lights
*Post contains affiliate links. I earn commission from Amazon purchases.
Buying a pre-lit artificial tree makes it so much easier to decorate. The branches stand up to the weight of the ornaments without sagging, and you can bend them when needed to help support hooks or other decorations.
- If you do use your own lights, use the same number of strands (100 mini lights per strand) equal to the height of the tree. For instance an 8 foot tree would have 8 strands, or 800 lights.
- I have found it’s easiest to add lights in an up and down pattern, moving around the tree as you go. Just start at the bottom making sure you can plug the cord into the outlet. Nestle the lights into the branches all the way to the top, and then back down again, back up, down, and so on. It’s a lot easier than adding lights horizontally and moving around and around the tree.
- Add lights to the inside near the trunk to add dimension to the tree. It’s one of the most overlooked parts of decorating but it makes such a difference.

Add Garland or Bows
After adding lights, move on to garland. You can use wide ribbon, beaded strands, or any number of styles that can swag around the tree.
- Space the garland evenly around the tree so there’s about the same amount of distance between each horizontal row.
- As you hang the garland make sure to give it some “movement.” If you’re hanging ribbon twist it, bend it, and lay it loosely on the limbs. If you use beads make sure you let it hang and droop as it wraps around. You don’t want your garland to look like it’s pulled too taught.
- If you don’t want to add garland you can add thick ribbon knots or bows. Place them in a staggered or zigzag pattern equally distanced from each other.
- In lieu of hanging strands of garland horizontally, you can place a large bow on the top of the tree and let matching ribbon hang all the way down so you get a vertical affect instead of horizontal.
Hang the Ornaments
One of my favorite tips is to forego those awful old fashioned ornament hangers that are so annoying to bend back and forth onto the ornament. I love using a mix of these hangers and these. They both are easy to hook on to the ornament ring and come off easily when it’s time to pack everything away.
I also like that I can get them in gold or silver to match the decorations.
- When adding ornaments, begin with the largest or most statement-making pieces. Place them in a zigzag or staggered pattern. This will keep the eyes moving around the tree.
- Just as with lights, place basic ball ornaments on inner branches to help fill gaps within the tree, and to add depth.

Don’t Forget the Base of the Tree
Coordinate a Christmas tree skirt with the tree décor. Or, use an all-purpose white or off white skirt that goes with everything. You can also use things like throws or table cloths to wrap around the tree base.
Add something decorative under the tree in addition to gifts, like mini trees, deer, nutcrackers, mini Santas, snowman, train track, an old wagon or sled, or other vintage toys.
Wrap gifts so they coordinate with the tree décor and complete the overall look.


Final Tips and Details
Here are some final tips to keep in mind as you decorate your Christmas tree this year.
- Create your own garland and tree topper with wide ribbon. I bought 2 rolls of wide gold mesh ribbon from Hobby Lobby. I used one roll to wrap around the tree, and the other to create a “poof” for the top. There’s still plenty leftover to incorporate into other areas, like gift wrapping or the fireplace mantel.
- Although the ornament sets may come with traditional hooks, get some decorative ones to use instead. They look so much prettier and are much easier to use.
- For this tree skirt I used a gold velvet throw with feather trim. It’s a great FREE solution for something that can otherwise be pretty pricey.
- Wrap gifts in paper that coordinates with the tree. Here, I love the music motif on the paper. It’s a neutral theme and has a gold-ish tint. Holiday music is truly one of my favorite things about Christmas. See my coordinating music theme Christmas table here.
- Using large decorative pieces under the tree is a great way to add another layer of interest to the Christmas tree.
- Don’t forget to coordinate other areas of your room like the fireplace mantel, bookcases, stair railing, and coffee table. You can see how I coordinated my mantel décor for Christmas here.

Christmas Entertaining Just Got Easier!
With my Christmas Entertaining Simplified Party Planning Bundle
- Create crowd pleasing menus you can actually make & prep ahead.
- Include party decorations, themes, and fun details for all ages.
- Feel confident knowing you’ve created a fabulous experience for your friends and family.
- Relax and BE A GUEST AT YOUR OWN PARTY!
Are you excited about decorating your tree and Christmas entertaining? What’s your color palette or theme?
If you like this post, PIN, Share, or sign up for our Newsletter at the top of the page. And don’t forget to follow CAH on Instagram or Pinterest. Cheers!


What size of ribbon did you use?
Caryn, the ribbon is 5 1/2 inches wide.
Love your tree!
Erika, it looks like they don’t have the set that I bought, on the website. I don’t know if it’s in the store or not. However, the closest thing would be the Natural Wonder, as it’s in the gold, silver tones.
I’m hosting Christmas for the first time in years which means I have to put up the tree. I love the tree when it’s done but it’s so much work. I use gold, chocolate brown and copper colored glass ornaments, along with some white (or clear) and lime green for punch. I stopped using my Hallmark ornaments sometime ago but still buy them every year. Chris, which tree did you use and was it a one connection, one plug in assembly? Think I’ll go for a slimmer look this year.
Karen, I got the 8 foot tree – it’s linked at the top of the post (3rd paragraph). It comes in 3 layers so each layer plugs into the one it’s attached to. One plug at the bottom goes into the wall with a foot press to turn it on and off.
The tree looks amazing! Love the deer. Puts the finishing touches on it. My own family usually thumb tacks a skydiving bear ornament on the ceiling above the tree. It puts the finishing touches on it.
Thank you for the tips! And the beautiful pictures.
I am a huge fan of Christmas decoration.Love your Christmas decoration…This Christmas tree is truly magnificent and these silver and golden look wonderful, Chris!This will definitely brighten up your holiday season.
I always do mine early because we host a 100 plus person cocktail party in early December. This is one thing I can control early. We did gold and silver last year and I agree, you can reuse those ornaments with anything. This year, I’m shooting for more of a white look, but the gold and silver look great with it all.
Same here, Jessica. I’m usually scrambling as soon as Thanksgiving is over to get everything ready!