Pipe And Drape System DIY

I’m often asked about creating backdrops for parties, and realized I needed to share my unique tutorial with you here.
This is my DIY pipe and drape system that is perfect for a photo backdrop, or for when you want to create some interest behind a table but you don’t have a wall. Best part is it costs less than $20!

Supplies
- 3 lengths of 1-inch PVC pipe – I used two 7-foot pipes for height, and one 5-foot pipe for width. They will cut it to size for you at the hardware store.
- 2 “T” attachments, and 2 elbow attachments to fit your pipes.
- 2 medium sized buckets or planters.
- Quickrete – this is an easy-to-use, quick drying concrete.
How To Make It
- For each 7-foot pipe, attach one “T” and one “elbow” at opposite ends, using super glue if you like. See how it will look in the supply photo above.
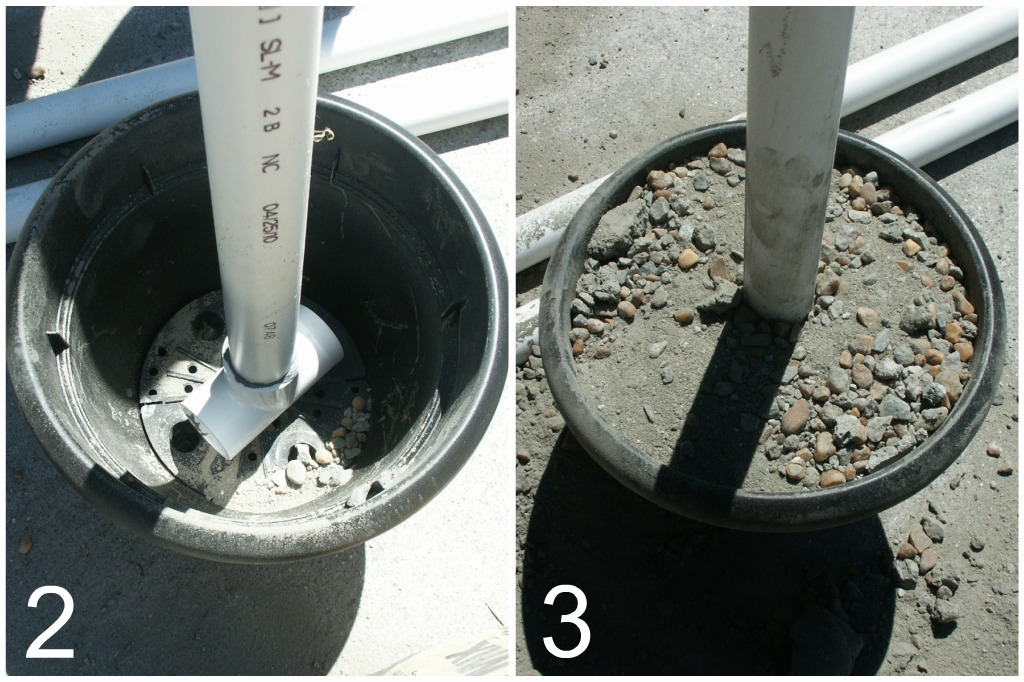
- Insert the “T” end into a planter or bucket. Make sure if there’s a hole in the bottom of the planter, you cover it. A simple piece of cardboard can work long enough for the concrete to set up.
- Fill the planter/bucket near the top with Quikrete. Do this for both 7-foot poles.

- Begin watering down the Quikrete in the bucket until it puddles on the top, but doesn’t overflow. The water will eventually sink down and you’ll continue to add water every 5-10 minutes until the puddle on top of the Quikrete no longer sinks down. You could also pre-mix the Quikrete in a large vessel if you like, and then add it in.
- Let your frame set up overnight (12 to 24 hours) and then you are ready to attach the 5-foot pole between the two base poles, using the elbow attachments. Now it’s ready to hang drapes or fabric.
Helpful Tips
- I suggest using a bucket or planter that’s about the same width or circumference from bottom to top. That way it will be more stable outdoors on uneven ground or light wind.
- Be mindful of how much concrete you put in your bucket or planter size. Too much and it will be too heavy to move around; too little and it will not be stable enough. Mine are about 5 pounds each, but I think up to 10 pounds is preferable and will be more stable.
- I created a fabric “sleeve” to cover the pipes for a more polished presentation. I cut long strips of fabric from a sheet, that would fit around the pole, lengthwise. Then hot glued a long seam together for a quick and easy no-sew cover. Simply slide it over the pole.
- You can also paint the PVC pipe to look more metallic or colorful. You’ll need to sand it first, and use plastic-rated spray paint for this.
- This pipe and drape system is easily transported or stored, and you can adjust the sizes of your pipes according to your needs. I wanted this to be tall enough to accommodate an adult male in the case of a photo backdrop situation.
If you like this post, PIN, Share, or sign up for our Newsletter at the top of the page. And don’t forget to follow CAH on Instagram or Facebook. Cheers!


Where did you get the fabric used on your pipe system? I’m interested purchasing/finding the scrunchy material that’s on the legs of your system so that I don’t have to spray paint it.
Thanks!
Hi Evelyn, I mentioned that in the post. Made from sheet.
Awesome tutorial!! Thank you so much for sharing! Found this via Frog Prince Paperie. You party girls are always so inspiring!
Thanks Iris. So glad you like it. : )
The pipes are very useful, isn't it? There's a lot of use in this pipe. It can be a pipe cage or a pipe drape.
It's just so brilliant!
shiori(at)gmail(dot)com
I love this soooo much! I've actually gotten quite a few emails from people looking for a backdrop how-to. Now I have a tutorial to point them towards! Thanks so much, I'll be spreading the word.
Hi Buttercream!
Since this can be disassembled into 3 pieces (top and 2 sides) I can fit it into my car trunk with the seat backs pulled down (so it's half in the trunk, half in the car.
I don't use this for all my photos. You may notice I use the 3' x 4' canvas board a LOT, and cover it with fabric (as seen in the Little Birdies baby shower or Sweet 16 birthday party).
I've used this pipe frame system for the French themed birthday party, the Autumn Engagement shoot, for a photo backdrop in the Pirate party, and to hold the "hanging buffet" basket in my Thanksgiving post. Check out the "CAH Styling" Label in the right margin to see any of these parties.
great info. How do you transport this for a party you are throwing for someone else? Also, is this what you use for all of your photos?
Brilliant! My friend just forwarded a link to your site because she knew I'd love this idea. I am making one of these (maybe two) FOR SURE. I never would have thought to cover the pipes with fabric. That really dresses it up. Thank you so much for sharing this idea.
Great tutorial! Thanks!
Thanks so much for sharing this with us!
thanks for the tutorial chris!
thanks for sharing. this is great!
Awesome!!! Thanks for sharing. Looks like I have an upcoming project to complete, 😉
Thanks for sharing! I am going to make one of these to use for parties.
GENIUS! Just sayin! =)
I am one of those people that have wondered! Thanks so much, this one is going in the bookmarks! 🙂
I love that you're sharing this!
xoxo
kristi
Great post! I was looking for something like this for a show.
Chris, your timing couldn't have been more prefect! I needed to look into making some pipe and drape for a party I'm hosting in April. I thought I might have to rent some from a local exhibit company.
Thank you, thank you, thank you!
I was planning on making one of these this weekend for a backdrop at an upcoming shower. I planned on using the pvc pipes, but was trying to figure out how to cover up the side pieces to make it look nice. Never thought of making sleeves or using planters. So excited to make my own now!
Awesome tutorial!
Paula
What a great idea! Thanks for sharing.