• Skip to primary navigation
  • Skip to main content
  • Skip to primary sidebar
  • Skip to footer
  • Blog
  • Parties
    • Dinner Party Menus
    • Themed Dinner Ideas
    • Tablescapes
    • Cocktail Parties
    • Buffet tables
    • Designing Dessert Tables
    • Best Party Tips
    • Parties by color
  • special occasions
    • Birthdays –>
      • for Adults
      • 1st birthday
      • for Girls
      • for Boys
      • for Teens/Tweens
    • Bridal shower
    • Baby shower
    • Engagement / Anniversary
    • Weddings
  • Seasonal | Holidays
    • Spring
      • Easter
      • Graduation
      • Cinco de Mayo
      • Kentucky derby
      • Mother’s Day
    • Summer Entertaining
      • Father’s Day
      • 4th of July
    • Autumn
      • School Days
      • Football parties
      • Halloween
    • Holidays
      • Thanksgiving
      • Christmas
      • New Years
    • Winter
      • super bowl
      • Awards Night Party
      • Valentine’s Day
      • St. Patricks Day
      • mardi gras
  • Recipes

Celebrations at Home

Entertaining, Party Recipes, Cocktails, Tablescapes

  • About
    • Disclosures
    • Privacy Policy
  • Let’s Work Together
  • Food Photography
  • contact
  • SHOP
  • Nav Widget Area

Subscribe for Email Updates

GET UPDATES!

You are here: Home / DIY / Easter Peeps Garden Centerpiece DIY

Easter Peeps Garden Centerpiece DIY

Easter centerpiece diy
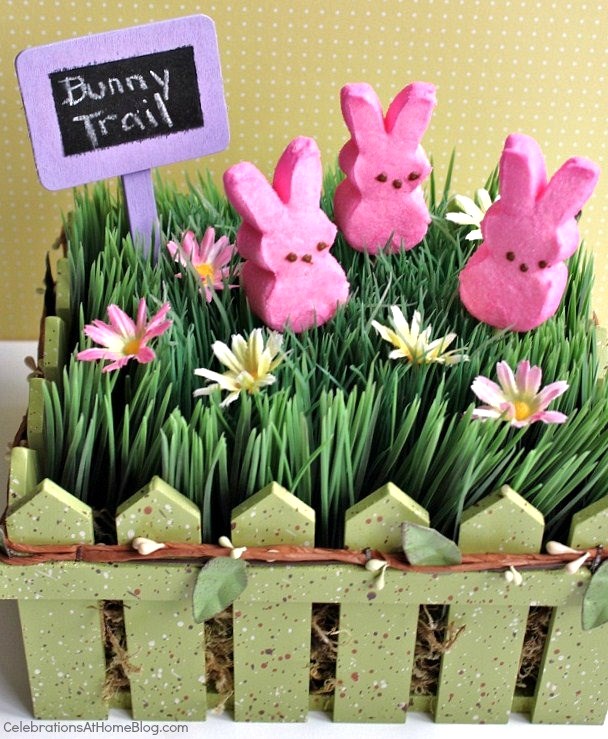
One of the cutest elements (and most commented on) from my Easter Brunch design was the centerpiece for the children’s table.  The Peeps garden, or “bunny trail” is simple to make and here’s what you do:
Supplies:
A “fence” style planter box from Michael’s (or similar)
Craft foam
1 or 2 Faux grass squares from Michael’s (or similar)
Bagged moss
Peeps
Skewers
Small wooden sign
Chalkboard paint (and other craft paint is necessary)
Directions:
  1. Cut your craft foam to fit inside the box, leaving a bit of room on each side to be filled with the moss.
  2. Tuck in some moss to cover the foam for a finished look from the outside.
  3. Place the grass patch on top of the foam.  You may need to cut one of the grass squares in order to fill the space you have.
  4. Paint small wooden signs from the craft store (these were some I found at Target last year already painted).
  5. Once the paint is dry, tape off the borders and paint the center with chalkboard paint.
  6. Attach a small wooden skewer to the backside with glue dots.
  7. Insert skewers into Peeps.
  8. Place Peeps and small sign into the grass patch and foam, and use as your centerpiece.
You can also add tiny flowers, chocolate candy eggs or jelly beans, or other decorative items to dress it up more.
Easter centerpiece diy
Enjoy!

Previous: Down On The Farm – Operation Shower
Next: A Preppy Collegiate – Inspired Design

Sharing is caring!

  • Share
  • Tweet

April 14, 2011 1:28 pm Chris Filed Under: DIY, Easter

Reader Interactions

Comments

  1. Cheryl says

    February 26, 2012 at 3:11 am

    This is so sweet! My little one is going to love making this with me. Now that the Easter Tree is done, we need a new project! Thanks for sharing!

  2. HiLLjO says

    April 14, 2011 at 5:15 pm

    SO cute! We all know I love my bunnies too!

  3. Kristin says

    April 14, 2011 at 3:05 pm

    Very cute! Thank you for the "how to"!

  4. Pam @ PartyStart.Me says

    April 14, 2011 at 1:51 pm

    Absolutely adorable! Thanks for sharing this Chris.

Primary Sidebar


The most important thing about parties & entertaining is the guest list! Next, it should be delicious, beautiful, unique, and fun. Chris Nease shares her years of experience for how to pull it all together with style. Cheers!

Footer

Celebrations At Home is a participant in the Amazon Services LLC Associates Program, an affiliate advertising program designed to provide a means for sites to earn advertising fees by advertising and linking to amazon.com. All our thoughts and opinions are our own and we are not paid for or mandated to provide a positive review.

  • Email
  • Facebook
  • Instagram
  • Pinterest

Search

Categories

© Copyright 2022 Celebrations at Home · Scroll to TOP · Log In