BEST Tips and Ideas for Designing Dessert Tables for Parties
Best tips and ideas for designing dessert tables for parties at home. Discover simple tips for dessert table design using mini desserts, cake centerpieces, sweets, and candies. Plus how to use props for decor.
Best Tips for Designing Dessert Tables for a Party
I’m excited to address the art of designing dessert tables in this edition of my Party Design Basics series. Dessert tables have become THE party staple and focal point thanks to leaders in design, like Amy Atlas and Sweets Indeed.
You can hardly see a styled party or wedding without an elaborate sweets display. And it’s a great way to make your event feel special.
But for the purpose of realistic home parties and celebrations, I’m going to cover some basic design principles that are a bit more achievable.
In addition to these sweets tables, here are some ideas for setting up a pie table for a party at home. These are all great for the holidays and birthday celebrations.
Keep the Food Selection Realistic
It’s no secret that I believe in using 1 or 2 designer desserts if you like, and then rounding out with more commercial items. The other items can be homemade, semi-homemade, or from the bakery.
Here’s my basic dessert table formula to keep in mind. This should be more than enough to satisfy your guests’ sweet tooth.
- 1 or 2 specialty items (show-stopping cakes, designer cupcakes, decorated cookies, etc.).
- 1 to 3 homemade treats, bakery items, or dressed up grocery store items.
- 2 or 3 candies to fill out the table.
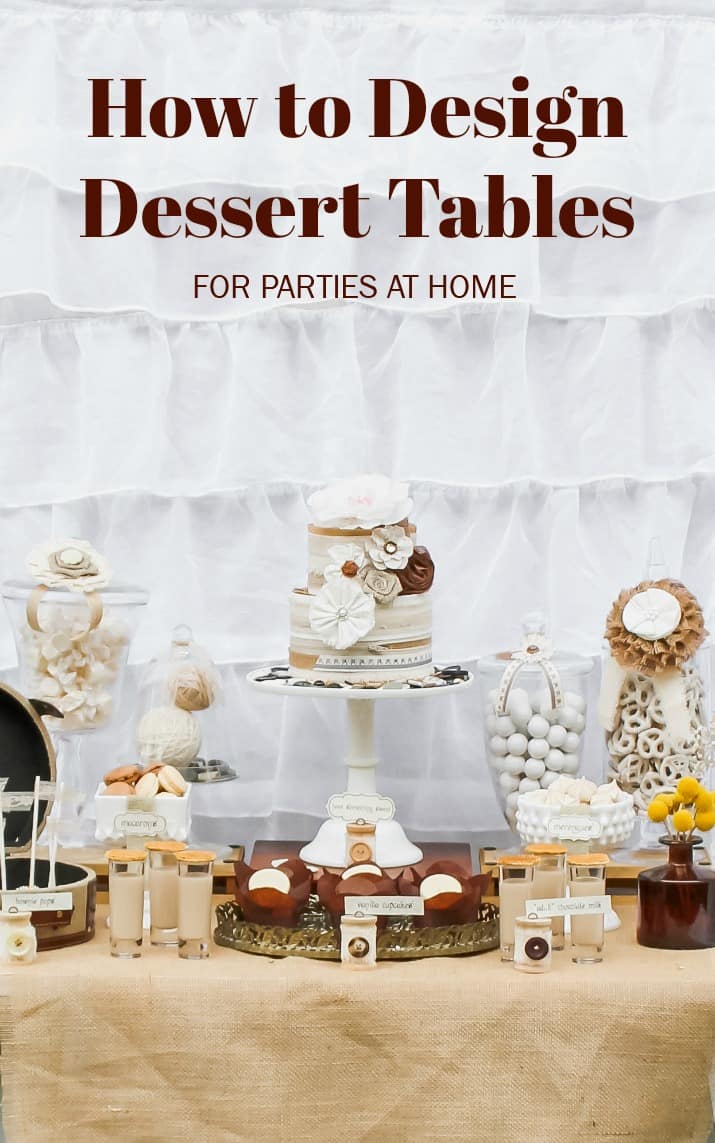
In the anniversary party cake table above, we have a simple cake centerpiece. The rest of the table is filled in with color coordinated treats and candies. The cake is homemade, the cupcakes are semi-homemade, and the macarons are from the bakery.
Variety is the Spice of Life
Serve a variety of flavors and textures unless of course you are specifically doing a “chocolate” party or other flavor-themed party.
- Good choices that can add different flavor and texture are Cakes + Parfaits + Bars + Something Crunchy. These would make a wonderful assortment, and a taste to satisfy all palates.
- You can also add different textures to a chocolate theme with creamy chocolate truffles, soft whoopie pies and brownies, chocolate cups filled with Bailey’s or eggnog, and crunchy pirouettes with milk shots. The same principle can applied to fruit themes too.
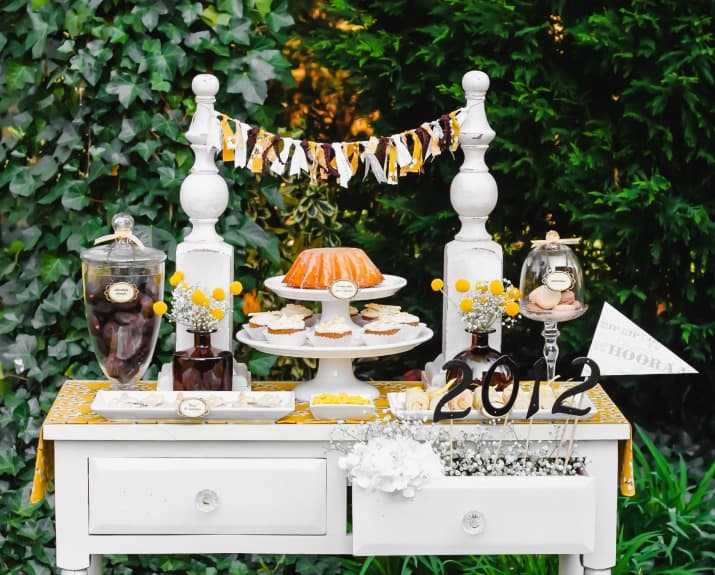
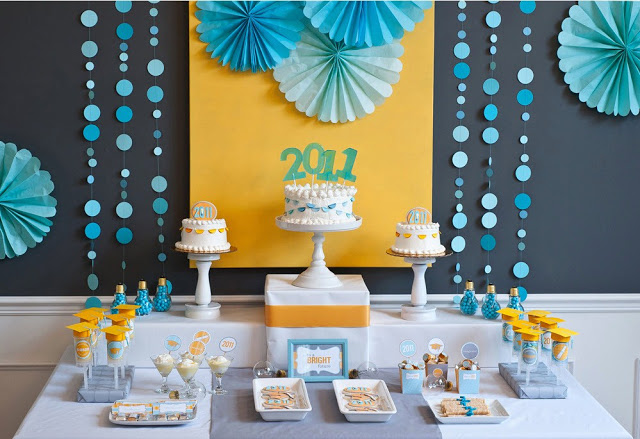
- In the graduation dessert table above, we had orange flavored cake, spiced cupcakes, chocolate donuts, crispy puff pastry rolls, crunchy macarons, and creamy white chocolate candies. There’s something for everyone!
Height is Essential
When designing dessert tables, the main thing is to go for balance and keep the eyes moving – much like interior decorating.
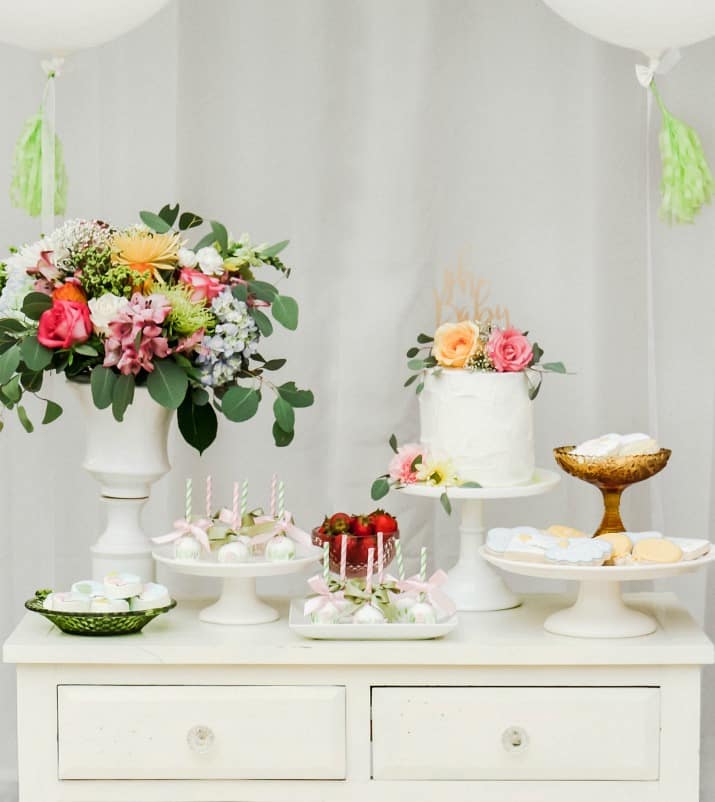
- You can begin designing from the center and work outward, OR from the two ends and work inward. With the balloon theme baby shower dessert table above, I worked from the outside in.
- Start with the height in the back and from there you can add varying rows and levels to fill in the blank space.
- Please don’t set everything flat on the table! Use bowls turned upside down or boxes to put plates on to add height. In the table above, I added height with decorative items like flowers, and tall cake stands.
Space Management
One of the big mistakes I see a lot of people do is spreading all the dishes out to take up the available table space. Instead, bring it all closer together so it looks more deliberate, and it actually looks more abundant.
- If your table is too large and you don’t have enough food, add flowers, sculptural elements, or home decor pieces to the presentation. Some decorative items to use are vases and urns, empty frames, apothecary jars, framed printable signs, architectural elements like wood finials, etc.
- You can also designate one end of the table for the desserts and the other end for something else like a signature drink, a guest book, photo display, or favors.
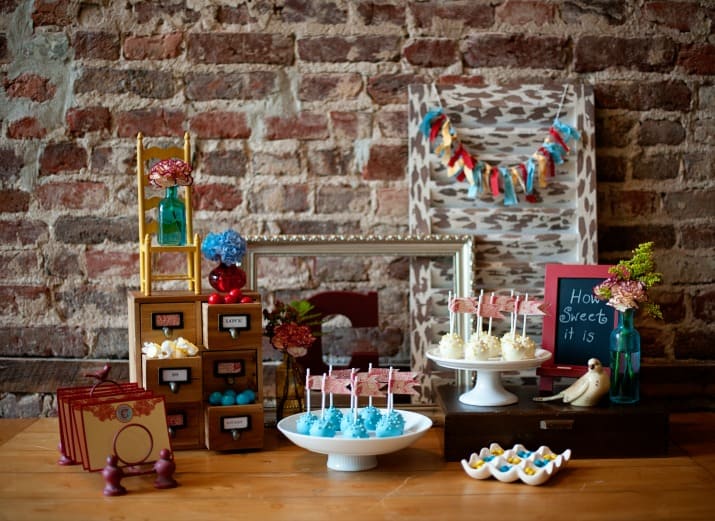
- The rustic-modern bridal shower sweets table above was set up on a long table. I placed everything close together so it looks unified. If I had spread everything out to take up the entire length, the impact would be lost and it would look sparse.
- The backdrop pieces help define the dessert buffet and the decorative items are visually connected to the food.
Symmetrical vs. Asymmetrical
One of the most fun, and sometimes trickiest parts of creating a dessert table is deciding how and where to place everything. Do you want to create sleek symmetry with one side mirroring the other, or do you like to have an eclectic unique look on each side?
- A symmetrical design tends to be more classic & traditional. The thing to remember is to keep the vessels, the levels, and the colors uniform on both sides. This usually means your center point is the focal point and should be pretty special.
- An easy way to achieve symmetry is to divide the dessert items in two groups. So if you have 12 cupcakes, you can display 6 on one side and the other 6 on the other side. So simple!
- Choosing an asymmetrical design allows you to be a bit more free and creative since you don’t have to be so precise. It also lets you create a focal point on either side, and bring in eclectic decorations to add to the overall look.
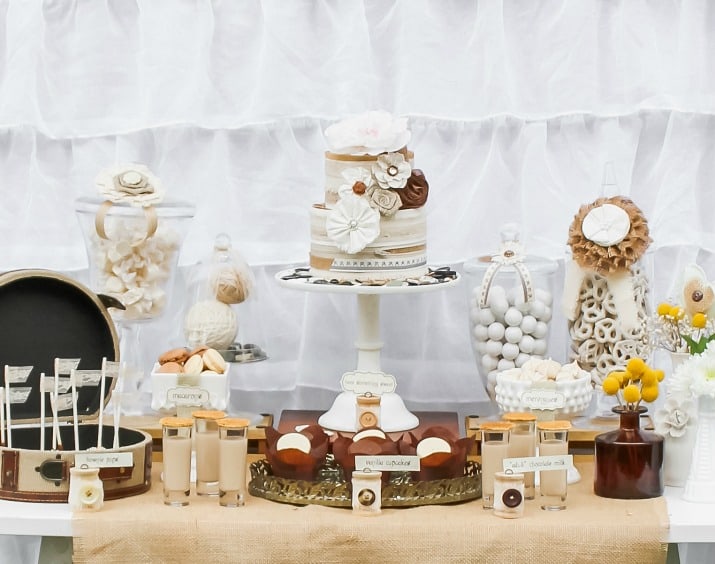
- If you prefer this approach, remember to create balance by adding visual weight or height to the backdrop or opposite side. The best example of asymmetry is the rustic table, and baby shower table shown above.
- I used a symmetrical design in the shabby chic dessert table above. Nothing ‘matches’ but everything ties in together through color and style. The height of the apothecary jars balances the height of the centerpiece, and creates a back row relative to the desserts in the front.
How to Create a Dessert Display
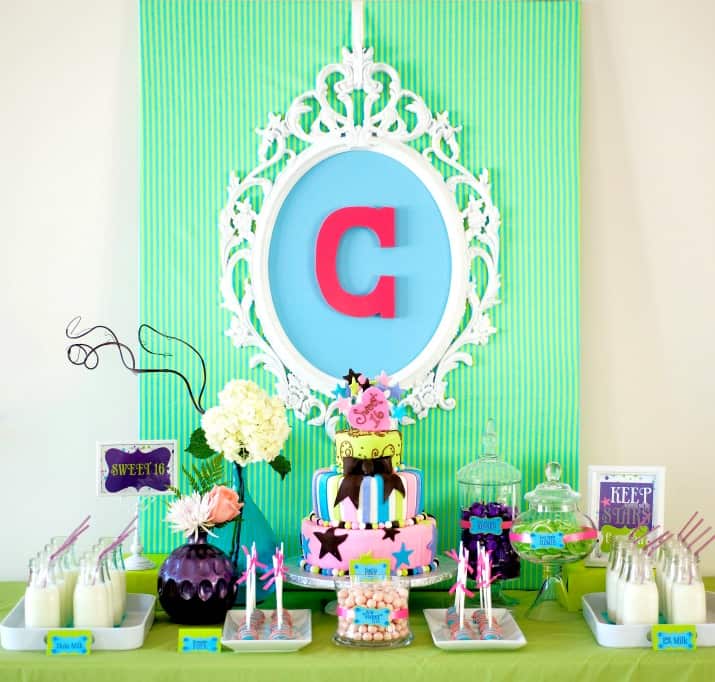
Let’s see how the design tips play out in the Sweet 16 birthday party above.
- Symmetry vs. Asymmetry – We have created a symmetrical cake table by dividing the brownie bites and milk bottles and placing on either side.
- Food Selection – Our basic formula is used here with one fabulous designer cake as the centerpiece of the table. Next are homemade brownie pops and color coordinated candies.
- Variety – The cake was vanilla flavored so we added chocolate brownie pops in our supporting role. Candies are fruit flavors and were chosen for their color.
- Space – This display of sweet treats was brought together in the center of a longer table, making it more cohesive.
- Height – The cake centerpiece adds height and is visually connected to the framed monogram above it. Apothecary jars, vases, and printable signs add more variations of height in the back row.
Get more ideas with these 5 easy steps to create a dessert table.
5 Ways to add Height
- Add height by placing a tray on votive cups turned upside down, or chunky candlesticks.
- Use large pillar candlesticks to hold small vases of flowers or candles.
- Wood boxes, hat boxes, crates can all be used as risers to hold small treats or trays of sweets.
- Cake stands can hold more than just cakes. Place bite size desserts on them, or mini parfaits and drink shots.
- Fill apothecary jars with ornaments, moss balls, or other trinkets if you don’t have enough candy to fill them, but still need the height.

Final Tips for Designing Dessert Tables
- Don’t go overboard with food. Just because it looks gorgeous in photos & blogs doesn’t mean you and your guests will eat it all.
- Add variety to your food selection with different flavors & textures.
- Keep the eye moving with height, levels, and rows.
- Keep your display tight. Too much space between items makes it look sparse and unfinished.
- Add interest to the display with decorative features like flowers, seasonal items, and home décor pieces.
- Get creative with how you display food. Incorporate unusual or unexpected pieces like old kitchen scales, vintage soda crates, garden vessels, etc. Always keep things food safe by lining them if necessary.
I’m hoping these tips will help you create a pretty dessert table step by step. And remember, you don’t just have to serve sweets like this; appetizers and brunch parties also look fantastic when displayed this way!


Wow, thank you for explaining to me that there is a lot of technique to the layout of a dessert table because the layout can affect the mood, such as symmetrical looking more classic. I am trying to host a professional event for some of my colleges. I have no style sense; however, I want to make sure I have good treats and a good appearance. It sounds like I should look into food services that can get me desserts that look amazing and will feed my crowds.
Hi Greta, yes I think if you have a large event size group you’ll need to incorporate some professionally prepared desserts. You can fill in with items you purchase from a bulk store, like candies, flavored (sweet) popcorn, cupcakes, cookies from the bakery section, etc. Good luck with your planning!
I’m having my first tea party. I am having it at my home for five little girls and their moms. I am looking for tips. Thank God I came upon this site. Thank you.
I’m so glad to hear it, Denise! Let me know if you need help finding something else. Cheers!
Great tips! I also wanted to add that while going overboard with food is risky (and easy!), it is probably still a safer mistake than going ‘underboard’! I am sure I’m not the only person who feels deeply and meaningfully insulted if my host puts out a paltry spread…!
Love this post! This may seem like a fairly simple question and it may have already been asked as well. When setting up a dessert table for a client, do you stay on site? It’s probably not necessary to stay around to serve cake pops and gum balls so do you just come back after the event to collect the dishes and props? Or is it normal to include the cost of those items in the price? I’m fairly new to the dessert table concept and I’d love to incorporate it so any advice would be awesome! Thank you! Keep up the good work.
Thank you so much for the great tips! I can see myself using every one of these in my next party table design. Thank you for making it easy to understand and providing the summary at the end. Greatly appreciated!
Thanks for the sweet comment, Cheryl. I’m glad you’re finding these tips helpful 🙂
Wow that was strange. I just wrote an really long comment
but after I clicked submit my comment didn’t appear. Grrrr… well I’m not writing all that over
again. Regardless, just wanted to say superb blog!
A few months ago I searched the web for this info. Nothing! Thank you so much, all of these table displays are beautiful!
Thank you, Heather. So glad this has been helpful for you!
Great tips for designing a desert table. perfect for any party.
Chris,
Thank you for these great tips. It’s good to have a reminder! I love these examples and will use in my displays.
Thank you!
Karis Walker
Chris. I am speechless. Your article is well written, truthful, 100% generous. So self giving, telling us these precious secrets you have learned through hard work and years of practicing. I am even a little bit worried on how you are somehow risking being bothered by people who want everything for free on the internet and how these kind of people can never be satisfied. As for the tips, they were really helpful, the kind of thing one says “why haven’t I thought of it before?” or “my goodness, it makes to much sense”. When I read your description and I see your pictures, everything becomes cristal clear. Your direction is awesome. You write very well, in a beautiful English and by reading your article I could picture you as an excellent teacher. Congratulations and thank you! I wish a wonderful year and the best success for you. Beatriz
I’m blushing, Beatriz. So many sweet words. Thank you!
Hi Chris,
I loved your post. Im doin my daughters first birthday party, and its a lot of work 🙂
Im from Brazil and I just cant find this beautiful plates and ceramic cake stands and platters.
Ill visit San Diego next month, so I could use some help to buy online and bring home ;’)
Thanks
Wow, this post is SUPER! Thank you for all the great info! It makes so much sense the way you described everything. I’ll definitely be using your fab instructions! Please write ~more~ how-to, insider-secret posts like this!!
You guys have made me so happy! Happy in knowing that you found this information to be very useful and helpful! Thank You!
I have a party this Saturday and will definitely keep your tips in mind as I’m adding the finishing touches. Thank you for this awesome post Chris!
Great tips – thanks! I think I always feel like I need to use my table space and then I wish I had more food but I don’t want too much that it’s wasted. Moving it all together is a great idea … I can’t wait to try this at our next shindig.
I did my first dessert table last spring for my daughter’s First Communion party. It was so much fun designing it and coming up with all of the goodies. My mom is a fabulous baker so she made some of our favorite cookies which we paired with cupcakes and bright, colorful candy. It turned out great!
I love the tip about moving stuff closer together to make it look more deliberate. I think I tried to use up all of my table space when I could’ve bought less by moving things closer to the center.
Just wanted to say what a great post! I have been viewing many of the dessert tables I see with skepticism…Not because they aren’t visually stunning…they are…but because many are almost more decorative than edible. Huge jars of hard candy, massive containers of colored marshmallows, gum balls in the correct colors. All these items are visually appealing but hardly economical or very practical….I go to a lot of events and I’ve yet to see anyone chowing down on fistfuls of marshmallows…. hence I love your admonishment not to go overboard with food…a potentially expensive and wasteful course. Great tips for a wonderful looking, awe-inspiring table without wasteful, over-the-top elements!
I totally agree. Great tips, Chris.
Excellent articlel Chris! One thing I like to do when designing my tables is to do a rough sketch mock up. It helps me to put it all into perspective and make changes without jostling around my desserts. 🙂
Great suggestion, Paula. Thanks!
What amazing tips! Love how you explained so many little details to such a beautiful project.
Love this post!! Thanks for sharing!! 🙂
Great post!!! Very usefull tips!!! Thank you for sharing it! I’m also a brand new tablist and need all advise you can give!!
Hi Chris,
Although a graphic designer for many years, I’m a relatively new Dessert Tablist (as Lauren says!). This is a GREAT post…love it! I’ve realized that adding height makes a huge difference. I struggle with getting great shots of my tables on the day of my event. Do you set up your tables in advance and have them photographed or do you photograph them on the actual day of the event? I think a lot of the shots on the blogs are gorgeous but just don’t seem realistic. For example, a set up outdoors in beautiful meadow or park. Um, wind, sun, melting? lol. I strive to keep it simple so this really appealed to me. I love the set ups in the post, especially the one with the brown background and beads. Thanks for great tips!
Thanks Leslie,
I always make time to take photos, even if it’s for a client. I let them know it’s part of my business ahead of time – they understand it’s used for marketing/portfolio so they’re very cooperative.
Super fabulous tips!! good job Chris!! Always something to learn 🙂
Great post!!! I’m a beginner Dessert Tablist (is that a word!?) And this post is super helpful! Love all your tables!!
I like that word, Lauren! ; D
Glad this was helpful.
These are great tips! Thank you for putting this together and making it easy and achievable for the average person to do on a realistic budget! I just shared with my facebook fans 🙂
Thanks so much, Rachel! Glad you appreciate it.