Yarn-Wrapped Flower Pots
by Melissa Bahen

Whether planning party favors for a big bash or a simple house-warming gift, you can’t go wrong with a cute plant in a sweet little terra cotta pot. Fragrant herbs, exotic houseplants, colorful flowers, and modern succulents all look at-home in inexpensive flower pots from the garden store, but you don’t have to settle for a plain pot. With some everyday materials and a few minutes, you can dress up terra cotta pots to match any festive occasion!

Materials:
- yarn in several different colors (cheap yarn is perfect for this project!)
- craft glue
- a sponge brush
- scissors
- small terra cotta pots
- potting soil
- small plants to go in the pots
Directions:
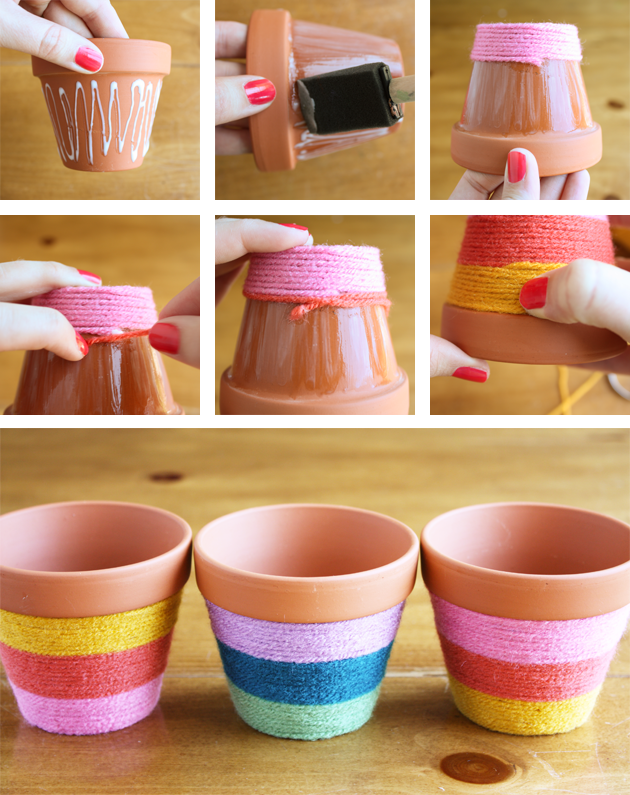
- Put glue all over the pot, but not on the rim. Use the sponge brush to distribute the glue evenly.
- Pick one color of yarn and start wrapping it around the pot. You don’t have to pull the yarn super tightly, but it shouldn’t be slack. For the first few rows, you’ll have to hold the yarn in place on the pot with one hand while you wrap with the other, but after 2 or 3 rows, it will stay in place by itself. Lastly, you don’t want any yarn ends showing, so when you first start the yarn, glue the first 1/2″ just below the edge of the pot, then put your first full row right up against the edge. As you start wrapping, you’ll cover up the loose end.
- When you want to switch colors, wait until you get the yarn to the back of the pot (where you first started wrapping), then simply cut the yarn off. When you start the next color, put a new dab of glue right on the end of the first color of yarn, then use a similar starting method as with the first color. Put about 1/2″ an inch of yarn just below the previous row, then angle the yarn upward to hit the glue dab. Hold the yarn in place on that spot while you start wrapping a new row right up against the previous one. As you wrap, you’ll cover up the new little tail and there won’t be any loose ends showing! The pictures below do a much better job of explaining than I can!
- Keep wrapping and switching colors until you get to the very bottom of the rim. When your yarn once again gets to the back side of the pot, cut the yarn, but a little extra glue under the last bit of yarn, and hold it firmly in place for a few minutes to secure it.
- Fill with potting soil and beautiful little plants.
- Give to friends, use as place card holders and centerpieces, or lay out in rows as party favors!
So cute and so easy!


Trabalho simples e muito bonito, tambem vou fazer. Obrigada Luiz Carlos.
I will definitely try this in the next coming weeks. I have two terracotta pots and I didn’t know what to do with them until I read this post! Thanks for sharing!
I adore wrapping items in yarn! I agree, it gives a cozy vibe 🙂